
Diving into Docker - A Beginner's Guide to Docker
In the fast-paced world of software development, efficiency and consistency are key. Enter Docker, a powerful tool that simplifies the process of creating, deploying, and running applications inside containers. In this blog post, we will take a beginner-friendly journey into the basics of Docker, exploring essential commands and the magic of Dockerfiles and Docker Compose files.
Before we dive into what Docker is, let’s explore why Docker.
Why Docker?
In the world of computers, virtualization is like creating special pretend environments inside our computer. Virtual Machines (VMs) were the first to do this by copying everything a computer needs to run, like a mini-computer inside a computer. But, oops, it made things slow and used up a lot of space.
Docker emerged as a transformative solution, introducing containerization to address these issues. Docker containers encapsulate applications and their dependencies, offering a lightweight and efficient alternative. By sharing the host OS kernel, Docker minimized resource consumption, optimized performance, and streamlined the deployment of applications.
Key Concepts
1. Images
Think of images as blueprints for containers. An image is a lightweight, standalone, and executable package that includes everything needed to run a piece of software, including the code, runtime, libraries, and system tools.
Imagine you have a recipe card for a dish. The recipe card specifies the ingredients and the steps to follow. In the Docker world, this recipe card is akin to a Docker image. It contains the instructions on what your software needs (like code, libraries, configurations) and how to set it up.
2. Containers
Containers are instances of Docker images. They encapsulate the application and its dependencies, ensuring that the software runs seamlessly across various environments.
Imagine you are a chef preparing a dish. The Docker container is like a takeout box. Instead of sending the entire kitchen with all the utensils, ingredients, and equipment to someone else, you pack the finished dish into a container. This container has everything needed — spices, ingredients, and the dish itself. It is sealed, portable, and can be easily transported to any kitchen with a microwave.
Installing Docker
Docker can be installed in two major ways: one for the desktop and the other through the Command Line Interface (CLI). The official Docker website provides all the necessary links for downloading Docker, as well as comprehensive documentation to assist you in case you encounter any issues.
Docker on Your Desktop
You can download and install Docker on multiple platforms as a desktop version. Here is the link Docker Desktop to download the appropriate version for your system.
Docker on Your CLI
You can download and install Docker on your CLI. Here is the link Docker CLI to install it using the apt repository.
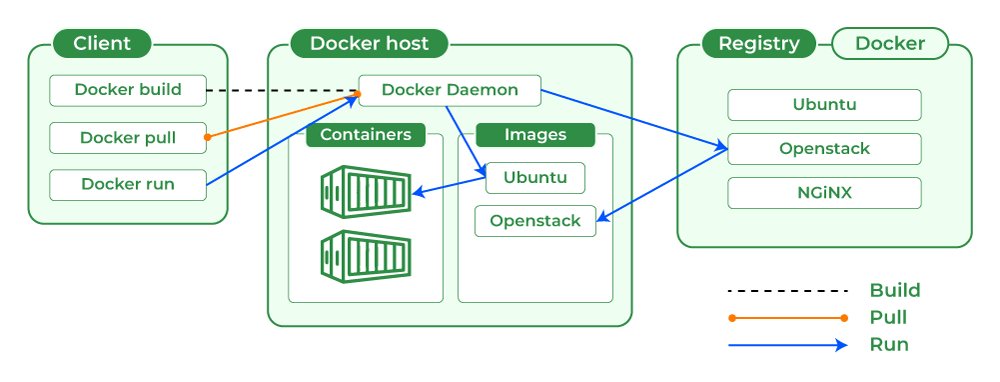
Architecture of Docker
Some basic knowledge on how Docker work behind the scenes. Feel free to skip if it is too overwhelming at this point. Docker operates on a client-server model. The Docker daemon, which assists in creating, launching, and distributing Docker containers, communicates with the Docker client. On the same system, the Docker client and daemon operate together, or they can be connected remotely. The docker client and daemon communicate with one another via a network or a UNIX socket using a REST API.
Basic Docker Commands
1. docker pull
To download a Docker image from Docker Hub (a repository of Docker images):
docker pull image_name
2. docker run
To create and start a new container from an image:
docker run image_name
3. docker ps
To list all running containers:
docker ps
To list all the containers running as well as stopped:
docker ps -a
4. docker stop
To stop a running container:
docker stop container_id
5. docker rm
To remove a stopped container:
docker rm container_id
6. docker images
To list all the Docker images that are currently stored on your local machine:
docker images
7. docker rmi
To remove one or more Docker images from your local machine:
docker rmi image_name
Dockerfile
Dockerfiles are used to create custom Docker images. They contain instructions on how to assemble a Docker image layer by layer so that the image includes everything needed to run a piece of software, including the code, runtime, libraries, and dependencies.
Below is an example Dockerfile for a Node.js application. This can vary depending upon the project and the project structure:
# Use an official Node.js runtime as a base image
FROM node:14

# Set the working directory in the container
WORKDIR /usr/src/app

# Copy the package.json and package-lock.json files from the host machine (the directory where
the Dockerfile is located) to the working directory inside the container.
COPY package*.json ./

# Install dependencies
RUN npm install

# Copy the current directory (the application code) into the container.
COPY . .

# Expose a port for the application to run on
EXPOSE 3000

# The default command to run when the container starts. In this case, the command that
will start your Node.js application
CMD ["npm", "start"]
In Docker, the ENV instruction is also used a lot. It is used to set environment variables within the image. Environment variables are key-value pairs that can be used to configure software applications and influence their behaviour. The ENV instruction allows you to set these variables during the image build process.
ENV key1=value1 \
    key2=value2 \
    key3=value3
Build the Dockerfile
To build a Docker image from a Dockerfile, you can use the docker build command.
docker build -t image_name:tag path_to_dockerfile
- -t: This flag is used to specify a name and optionally a tag for the image.
- image_name: The name you want to give to your Docker image.
- tag: An optional tag for your image. If not specified, it defaults to
latest. - path_to_dockerfile: The path to the directory containing your Dockerfile. If the Dockerfile is in the current directory, you can use a dot (.) as the path.
Docker Compose: Simplifying Multi-Container Applications
Docker Compose is a tool for defining and running multi-container
Docker applications. It allows you to describe your application’s services, networks, and volumes in a single
docker-compose.yml file, and then spin up your entire application stack with a single command. This is particularly
useful for complex applications that involve multiple interconnected containers.
Here is a basic example for a Node.js and MongoDB setup:
version: '3'
services:
  web:
    image: node:14
    ports:
      - "3000:3000"
    volumes:
      - .:/usr/src/app
    working_dir: /usr/src/app
    command: npm start
  database:
    image: mongo:latest
    ports:
      - "27017:27017"
Explanation of the above docker-compose.yml file.
web service:
- image: It uses the Node.js 14 image from Docker Hub.
- ports: It maps port 3000 on the host to port 3000 on the container.
- volumes: It mounts the current directory (.) to the /usr/src/app directory inside the container.
- working_dir: It sets the working directory inside the container to /usr/src/app.
- command: It specifies the command to run when the container starts, in this case, npm start.
database service:
- image: It uses the latest MongoDB image from Docker Hub.
- ports: It maps port 27017 on the host to port 27017 on the container.
This configuration suggests a setup where you have a Node.js application (web) that depends on a MongoDB database (database). The Node.js application is configured to run on port 3000, and the MongoDB database is exposed on port 27017.
Docker Compose Commands
1. docker compose up
This command starts the services defined in your docker-compose.yml file. It creates and starts containers
for all services.
docker compose up
Use ‘-d’ option to run in detached mode.
docker compose up -d
2. docker compose down
This command stops and removes containers, networks, and volumes defined in your docker-compose.yml file.
docker compose down
3. docker compose ps
This command lists the services and their status (running, stopped, etc.).
docker compose ps
4. docker compose logs
This command shows the logs for the services.
docker compose logs
You can also specify a particular service.
docker compose logs <service_name>
5. docker compose exec
This command allows you to run commands in a running container.
docker compose exec <service_name> <command>
6. docker compose build
This command builds or rebuilds services defined in your docker-compose.yml file.
docker compose build
7. docker compose restart
This command restarts services.
docker compose restart
More Commands
These commands are useful for cleaning up resources that are no longer needed, helping to free up disk space and keep your Docker environment tidy. However, use them with caution, especially in production environments, to avoid accidentally removing resources that are still in use.
1. docker builder prune
This command is used to remove all build cache. Builders are used in the build process to generate images. The --all flag ensures that all builder caches are removed, and the --force flag avoids any confirmation prompts.
docker builder prune --all --force
2. docker network prune
This command is used to remove all unused networks. Docker networks are used to connect containers, and this command helps to clean up networks that are no longer in use. The --force flag skips confirmation prompts.
docker network prune --force
3. docker volume prune
This command is used to remove all unused volumes. Volumes in Docker are used to persist data outside of containers. The --force flag skips confirmation prompts.
docker volume prune --force
4. docker inspect
The docker inspect command is used to obtain detailed information about Docker objects. It provides a JSON representation of various details about the specified Docker object. You can inspect Docker objects like images, networks, volumes, etc., by providing their names or IDs.
For example, to inspect a running container named “my_container,” you would use:
docker inspect my_container
Final Thoughts
This is just the tip of the iceberg when it comes to Docker, but it provides a solid foundation for getting started. As you continue your Docker journey, you will discover more advanced features and best practices to enhance your development workflow.
Happy Docking! 🚢🐳